We were fortunate to work with Tom Worley from Facilities Services and met with Tom initially to discuss options for mounting hardware and hanging methods for the Rio Grande textiles. Because the textiles would be mounted high up on the stairwell walls, and installation would take place from the top of a ladder maneuvered on the stairs, the choice of hardware was important to accommodate ease of installation of the hardware and the textiles.
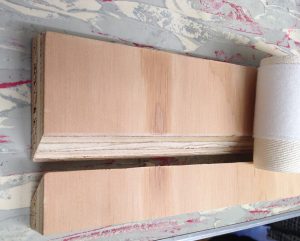
Wood cleat mounting hardware mock-up
Tom got back to us with a mock-up for a wood cleat mounting hardware system. The narrow strip of wood is the cleat that is attached to the wall. It has a mitered 45-degree angle that slants downward to the wall. The wider strip of wood, which would have Velcro hook strips attached with stainless steel staples, also has a mitered 45-degree angle and nestles down into the cleat. Jeanne, our Conservator, approved this hanging method, but not oak, the wood suggested by Tom. Oak is highly acidic, and even if sealed, can be harmful to the textiles.
So I set out to research woods with an appropriate pH. A document of exhibit materials from the Canadian Conservation Institute included a chart of a wide variety of woods and their pH, as well as wood sealants. Next, I looked at the Workshop Companion website and their chart of the mechanical properties of woods, including wood density and strength and the ease of use with power tools. By comparing the two sources, I chose several possible woods. When I ran these by Tom, he found that they were either very expensive or difficult to get in our rural location, so I made another round of searching. We decided on maple wood and I gave Tom the preliminary textile measurements so that he could order the materials. Final measurements for fabrication would be not available until the sewing of the Velcro/twill strips to the textiles was completed. Those accurate measurements were important, as the wood cleats had to be only 3/8” longer than the Velcro/twill strips.

Tom Worley of Facilities Services
The last step of this part of the exhibit design was to determine the placement of the textiles on the stairwell walls. Tom again helped us by bringing a 4 ft by 8 ft sheet of heavy cardboard reinforced with thin wood strips to act as stand-in for the textiles. On the ladder, he patiently shifted the cardboard up, down, and sideways until Tawney and I were satisfied with the placement, and then measured the placements for each textile so that the wood cleats would be centered and installed at the correct heights.